RF Explorer Pro Markers
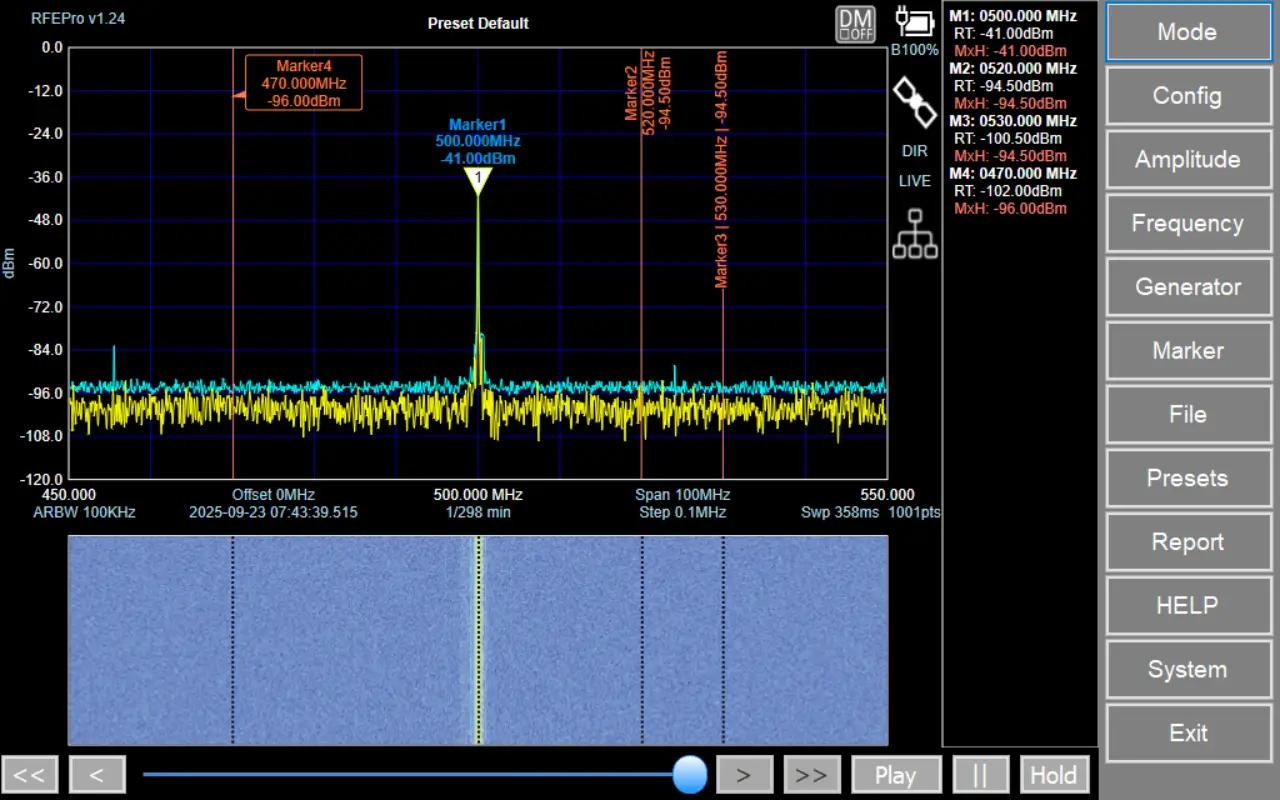
Configuration parameters that control the display of markers in different operating modes including Spectrum Analyzer, Frequency Coordination, Zero Span Trigger, Power Meter Trigger and Tracking SNA.
These settings allow to customize how markers are shown on the graphs and markers panel, providing valuable insights and enhancing your analysis capabilities.
Note
Extended Markers
From software version v1.24, extended markers are available in Frequency Coordination and Spectrum Analyzer modes.
The Standard marker are available for remaining modes.
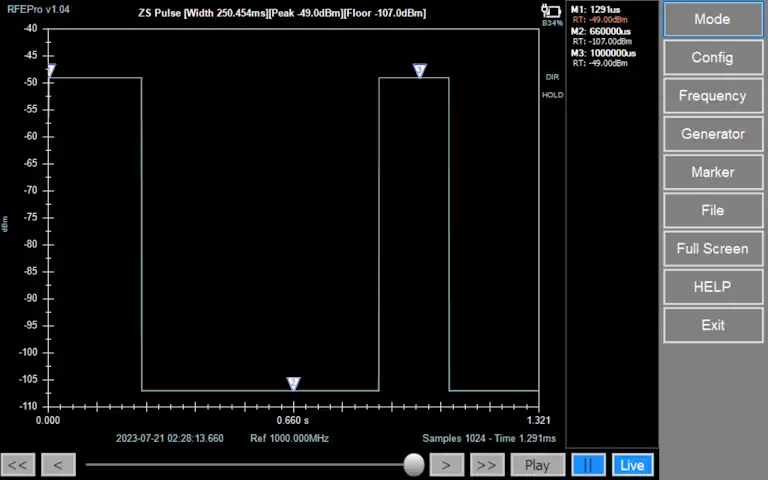
Spectrum Analyzer, Frequency Coordination and Tracking SNA markers are referenced to frequency, whereas Zero Span Trigger and Power Meter Trigger modes are based on a time reference.
In other words, Spectrum Analyzer, Frequency Coordination and Tracking SNA modes use markers to identify specific frequencies, allowing you to measure and analyze signals at different points in the frequency spectrum. On the other hand, Zero Span Trigger and Power Meter Trigger modes utilize markers in a time-based manner, enabling precise measurements and triggering events at specific time intervals.
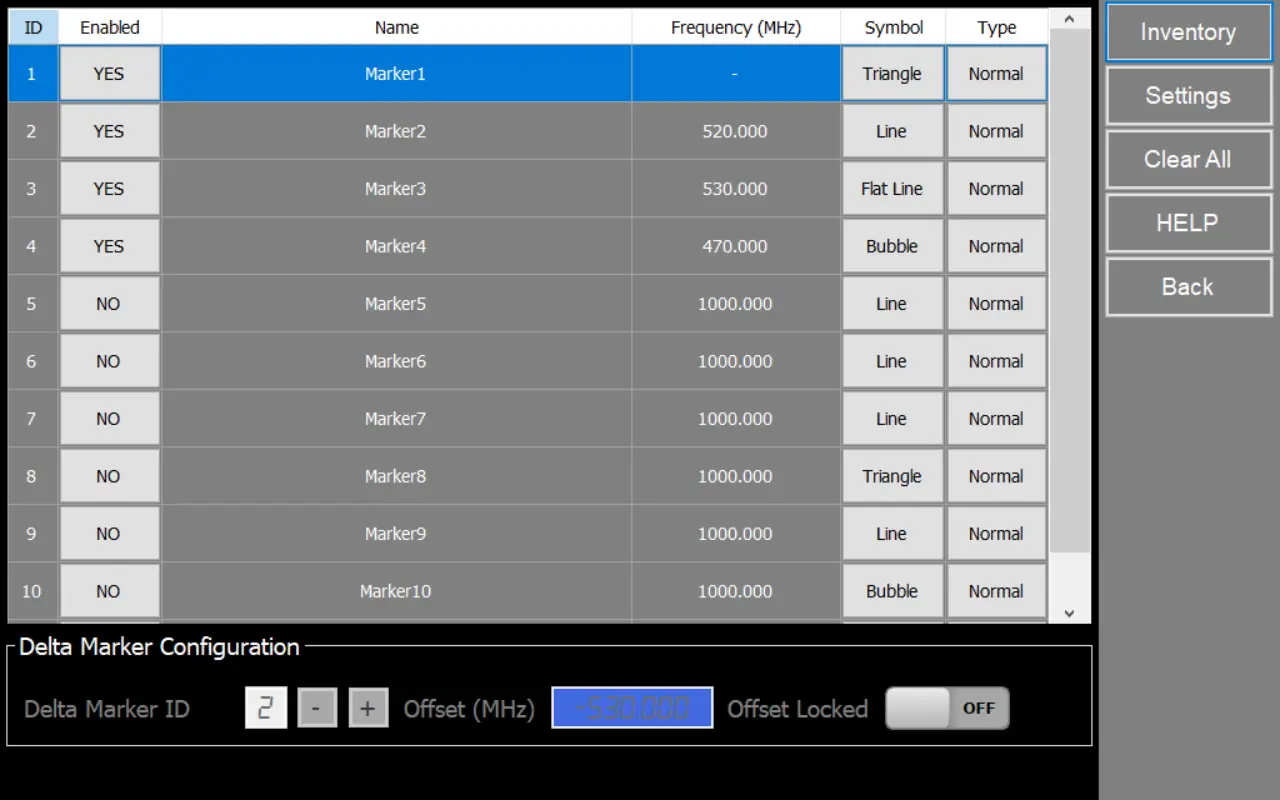
Markers Inventory
Marker ID
Marker Identification number
Enabled
Indicates whether the marker is active. Check “YES” to enable the marker
Name
User-defined name for the marker
Frequency (MHz) / Time (us)
Marker frequency/time (Only allowed for markers 2 to 100)
Symbol
Visual representation of the marker on the graph (Line, Flat Line, Bubble, Triangle)
Type
Type of marker Normal or Delta
Delta Marker Configuration
Delta Marker ID
Delta Marker Identification number. Check type “Delta” option to set a delta marker.
Offset (MHz) / Offset (us)
Frequency/time difference in MHz/us between delta marker and its reference marker.
Offset Locked
Enable a dynamic follow-up of the Delta ID to the Marker ID selected. It will follow the reference Marker if it changes position.
Clear All
This menu button remove all markers configuration from inventory but keeps defined marker 1 with default parameters (not enabled).
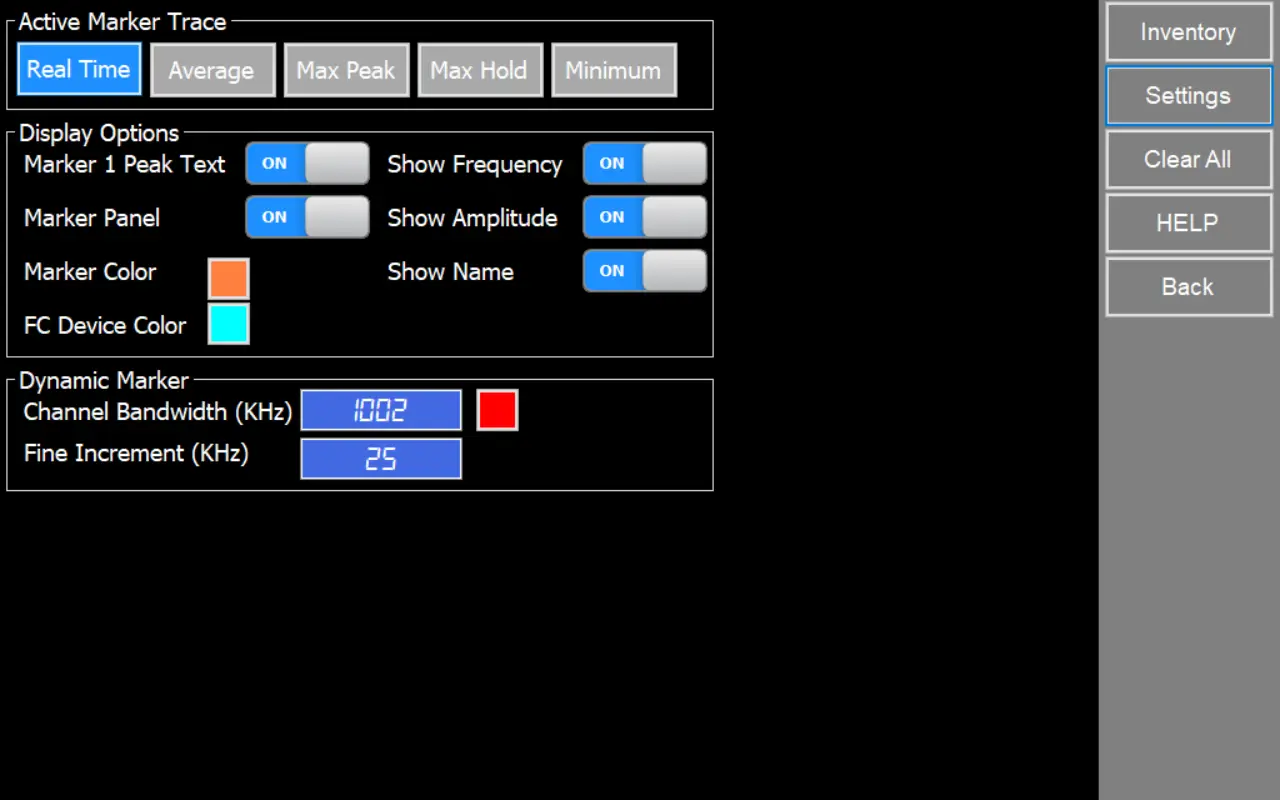
Markers Settings
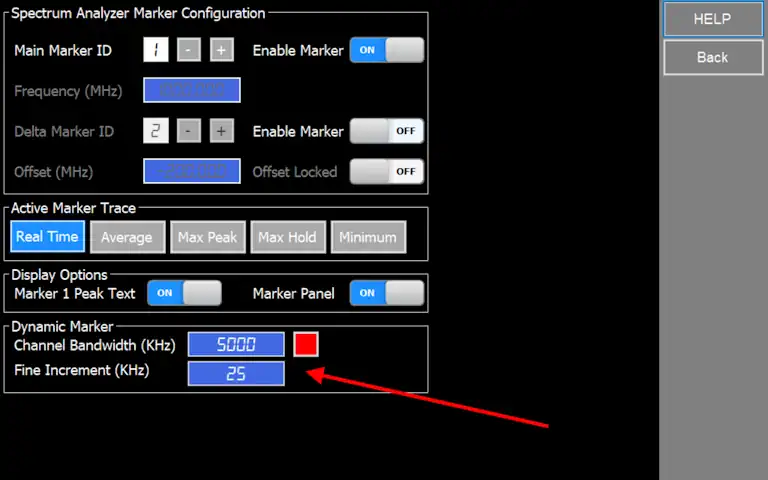
Active Marker Trace
Define trace that markers follow in visual representation.
For Dynamic Marker (DM) set the signal trace used to calculate information.
Marker 1 Peak Text
Show peak frequency/time and amplitude values for marker 1
Marker Panel
Show or hide markers panel to display visible markers table.
Show Frequency/Amplitude/Name
These settings control the display of individual data fields (Frequency, Amplitude, Name) for all visible markers.
Marker Panel
Toggles the visibility of the markers table, which lists the data for all active markers.
Marker Color
Toggles whether markers use distinct colors for easy identification.
FC Device Color
Sets the display color for the Frequency Coordination device marker.
Channel Bandwidth (KHz)
Sets the bandwidth around the marker's center frequency used for DM calculations. Value is in kHz.
Fine Increment (KHz)
Defines the smallest step size for finely adjusting the marker position. Value is in kHz.
Overwiew
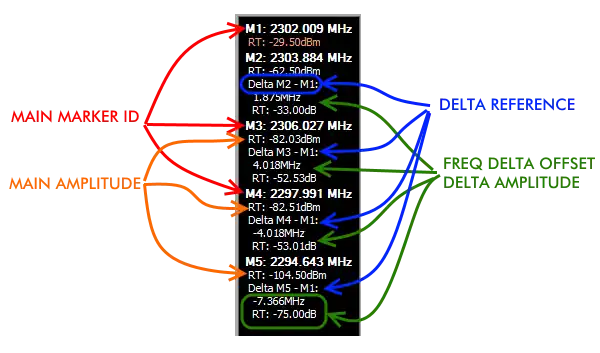
- Marker 1: It is special marker. It will search for peak trace point on screen and will track automatically. Therefore, frequency/time point for Marker 1 cannot be defined, will be dynamically updated by the application every sweep.
- Markers 2 to 100: These markers are defined for a specific frequency/time point, and will show amplitude values for all enabled traces on that frequency.
- Delta markers: This markers will be a reference of other marker, that is, it will be linked with a particular marker.
How to set up a peak marker
Set Enabled Yes, enter marker Name and choose marker symbol
Go to the Settings menu, and in the Active Marker Trace section, select the desired trace to track, such as Real Time, Average, Max Peak, Max Hold, or Minimum. (Marker 1 will detect peaks on the selected trace.)
How to set up a manual marker
How to set up a Delta marker
Select different marker than previous step such as marker 2, configure it setting enabled, frequency and alias name.
Notes
- Special Marker 1 can be Delta Marker of any other, but it cannot have associated any Delta Marker by Offset. The reason for this is Marker 1 works as auto-peak therefore cannot be defined as reference of any other.
- Markers defined by Offset use the value at the time of Marker definition, but does not update or keep that offset fixed if the Delta Marker changes frequency. For instance if you define Marker 5 at an offset of 5MHz of Marker 1, and marker 1 is currently at 100MHz, then Marker 5 will be located at 105MHz. If Marker 1 moves to a different frequency later, Marker 5 will remain at 105MHz, you can see the current frequency offset any time in the marker display panel.
- Future upgrades will allow for optional dynamic markers where offset will be locked so Main Marker absolute frequency value can change accordingly to the Delta Marker.
Dynamic Marker
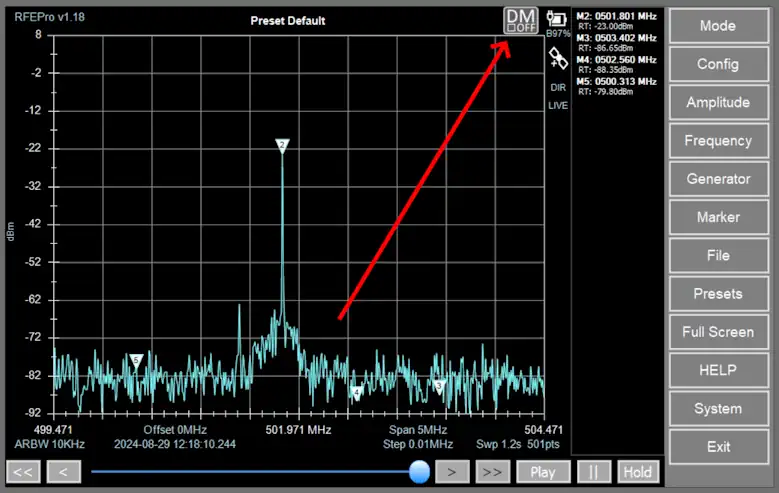
Starting with firmware v1.18, a new button labeled 'DM' appears at the top right corner, which is set to OFF by default. By clicking on it, you enable Dynamic Marker mode, and the button changes to the ON position.
The Dynamic Marker is an advanced and unique feature, designed to enhance your RF Explorer Pro experience by offering unprecedented control and insight into the spectrum analysis process. This innovative tool introduces gesture-based markers that allow for precise, detailed interaction with spectrum data.
Key Features of the Dynamic Marker:
Gesture-Controlled Precision
The Dynamic Marker uses intuitive gestures to let you pinpoint and analyze any point in the spectrum with ease. By simply interacting with your device, you can instantly view detailed information on both the amplitude and frequency of any chosen point, providing deeper insight into your spectrum data.Easy Marker Placement
Adding markers to your screen is now faster and simpler than ever. The Dynamic Marker allows you to place specific markers at key frequencies with just a few gestures, ensuring you can track important events in real-time without losing focus.Event Identification
This feature is particularly useful for identifying significant events on the spectrum. By automatically pointing to the exact frequency of any signal or event of interest, the Dynamic Marker helps you understand spectrum behavior with pinpoint accuracy.
Note
The Dynamic Marker data values are calculated over selected trace in Marker configuration menu. Select data trace to display capture information in "Active Marker Trace" option .
When Dynamic Marker is enabled, the Marker panels is hidden.
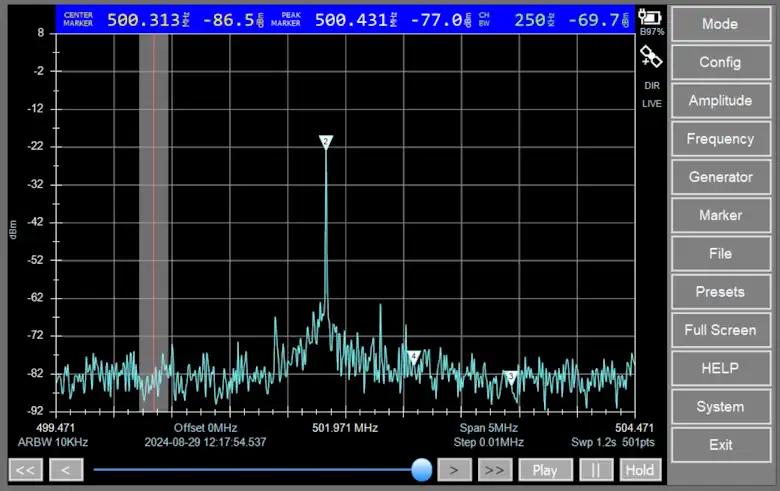
In this new mode, dragging horizontally across the spectrum no longer changes the center frequency. Instead, it displays a new marker showing three values at the top:
Center Marker
Shows the frequency and amplitude of the vertical red line, which is the reference marker position.
Peak Marker
Displays the frequency of the highest peak within the gray area (channel) defined for the dynamic marker.
Ch BW (Channel Bandwidth)
Shows the channel width in kHz and the amplitude of the entire channel. This can be configured in Marker Configuration settings.
Gesture-Controlled Precision and Floating Menu Options
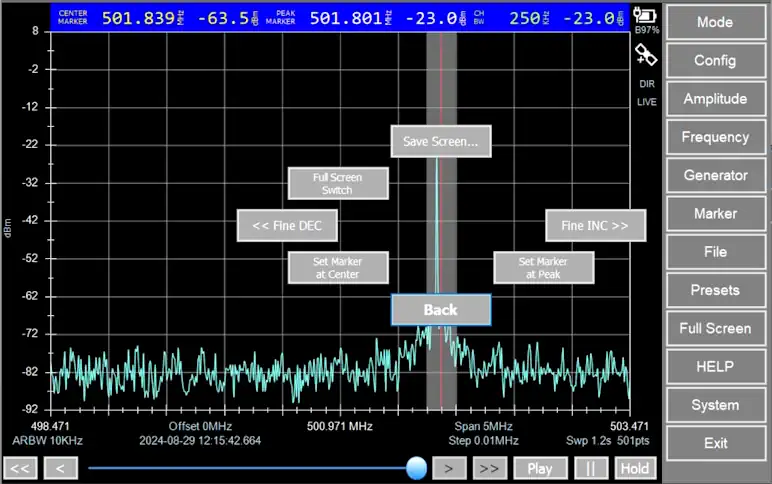
Once you release a gesture while using the Dynamic Marker, a floating menu appears, providing a range of powerful options for further analysis and customization:
Set Marker at Center
Instantly places a new fixed marker at the center of the Dynamic Marker’s current position, allowing you to quickly lock in on a specific frequency.
Set Marker at Peak
Adds a new fixed marker at the peak frequency within the current channel bandwidth, perfect for identifying and analyzing the strongest signal in the range.
Fine DEC
Decreases the Dynamic Marker’s frequency by fine increments, allowing for precise adjustments. The step size for these adjustments can be configured in the marker settings.
Fine INC
Increases the Dynamic Marker’s frequency by fine increments for detailed tuning. Like Fine DEC, the step size is adjustable in the marker configuration screen.
Full Screen Switch
Toggles full-screen mode on and off, providing a clearer view of the spectrum when necessary.
Save Screen...
Allows you to store the current screen as an image file, ideal for documentation or sharing your analysis results.
Reset Zoom
Available in Frequency Coordination Mode. If you have zoomed in on a portion of the spectrum, this option resets the view to the full range, offering a broader perspective.
Back
Exits the floating menu without performing any actions, leaving the Dynamic Marker in its current position.

